How to fetch and update S3 files with AWS Lambda, Serverless Framework, and TypeScript
Hey, I'm a polyglot Full Stack Software Engineer and IoT enthusiast.
I write about Node.js, AWS, Serverless, TypeScript, IoT, and Software Development in general.
You can also find me on these platforms: https://linktr.ee/ttarnowski
In this article, you're going to learn:
- how to create an S3 bucket with AWS CLI
- how to create multiple TypeScript AWS Lambda functions with access to files in the S3 bucket
- how to deploy the code and infrastructure quickly with Serverless Framework
Lambda functions are going to act as a simple User Management API and will be put behind the following HTTP endpoints:
- create user - /user POST
- modify user - /user PUT
- get user - /user GET
Data will be stored in JSON files on S3 named after user UUID that is going to be generated upon user creation. Here is an example:
// filename: 161b20e2-764b-4fb0-bc22-6fbeee4fd932.json
{
  "uuid":"161b20e2-764b-4fb0-bc22-6fbeee4fd932",
  "name":"John",
  "surname":"Doe",
  "role":"admin"
}
Terminology
Serverless - an on-demand service that allows for the execution of the code in the cloud.
Serverless Framework - a command-line tool, providing scaffolding, workflow automation, and best practices for developing and deploying serverless architecture.[1]
AWS S3 - object storage built to store and retrieve any amount of data from anywhere.[2]
AWS API Gateway - fully managed service that makes it easy for developers to create, publish, maintain, monitor, and secure APIs at any scale.[3]
TypeScript - a strict syntactical superset of JavaScript that adds optional static typing to the language.[4]
Prerequisites
- AWS Account
- AWS Admin IAM user
- AWS CLI installed and configured with Admin IAM credentials
- Latest Node.js
- Serverless Framework installed on your machine
If you haven't used Serverless Framework before or you have troubles with installing the above, check my previous article: Getting Started with AWS Lambda and Serverless Framework.
Step 1. Create an S3 bucket
In order to store the files with user data on AWS S3, we need to create a bucket first that is in an AWS nomenclature something similar to the root folder where all your files and directories will be kept.
To create an S3 bucket run the following command in your terminal:
aws s3api create-bucket \
--bucket example_bucket \
--region your_region \
--create-bucket-configuration LocationConstraint=your_region
where:
- example_bucket should be replaced with a unique name of the bucket
- your_region should be replaced with the region of your choice (default one is us-east-1)
This is how it looked like for me:
aws s3api create-bucket \
--bucket tomasz-example-s3-bucket \
--region eu-west-1  \
--create-bucket-configuration LocationConstraint=eu-west-1
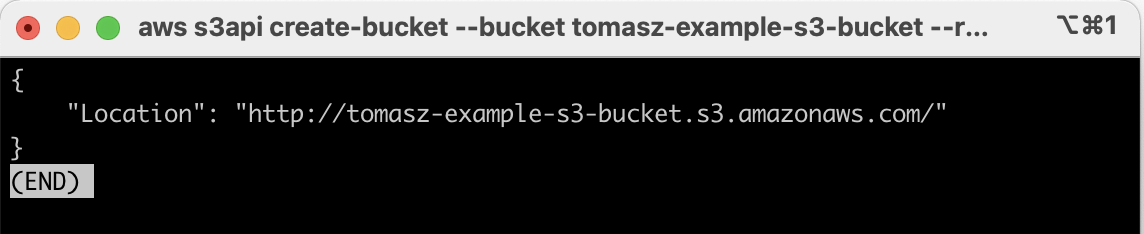
In case you see something like this after the successful execution of the command:
it's all ok and your bucket has been created successfully you just need to press the "Q" button on your keyboard to go back to the standard terminal view.
To ensure that your bucket exists you can run the following command:
aws s3 ls
And your newly created bucket should be visible in the output:
aws s3 ls

2021-07-23 13:38:04 tomasz-example-s3-bucket
Step 2. Create TypeScript serverless project from the template
Change the directory to the one where you would like your new serverless project to be created, for example:
cd ~/ProjectsTo create a new serverless project from my zero-config TypeScript template run:
serverless create \
--template-url https://github.com/ttarnowski/serverless-aws-nodejs-typescript/tree/main \
--path my-s3-lambda-function
where my-s3-lambda-function is the name of the folder where your project is going to be created.
You can open a newly created project (my-s3-lambda-function folder) with a code editor now.
Step 3. Infrastructure configuration
Serverless Framework makes it very easy to define all the infrastructure and endpoints - it's all kept in a single file called serverless.yml.
Let's open that file (it should be located in a root directory of a newly created project).
Region
The first setting that you might want to look at is the region. It determines the physical location of a server where your lambda code will be deployed to and executed.
To change the region of your lambda find the following section in the serverless.yml file:
# ....

provider:
  name: aws
  runtime: nodejs12.x
  lambdaHashingVersion: 20201221

# you can overwrite defaults here
#  stage: dev
#  region: us-east-1

# ...
then uncomment the following line and change the value to the region code of your choice:
# region: us-east-1
make sure region is under provider section, here is how it looks like for me:
provider:
  name: aws
  runtime: nodejs12.x
  lambdaHashingVersion: 20201221
  # region uncommented below and set to "eu-west-1"
  region: eu-west-1
Functions
Now let's define lambda functions and put them behind API Gateway endpoints.
We're interested in this section of serverless.yml:
functions:
  hello:
    handler: src/handlers.hello
we want to change it to look like this:
functions:
  getUser:
    handler: src/handlers.getUser
    events:
      - http:
          path: /user/{uuid}
          method: get
  postUser:
    handler: src/handlers.postUser
    events:
      - http:
          path: /user
          method: post
  putUser:
    handler: src/handlers.putUser
    events:
      - http:
          path: /user/{uuid}
          method: put
In the code above we've created 3 API Gateway HTTP endpoints:
- GET /user/{uuid} where uuid is a required custom path parameter (example request:
https://<api_gateway_url>/user/161b20e2-764b-4fb0-bc22-6fbeee4fd932) - executes "getUser" function in handlers.ts - PUT /user/{uuid}- executes "putUser" function
- POST /user - executes "postUser" function
Roles
AWS implements a zero-trust security model. It means that as a default our lambda functions don't have access to any of AWS resources and therefore it won't be possible to create or modify the files in the S3 bucket without defining explicit access rights.
In Serverless Framework these access rights are called IAM Role Statements and they can be specified under the following section in serverless.yml:
# ...
# you can add statements to the Lambda function's IAM Role here
#  iamRoleStatements:
# ...
To give our lambda functions access to S3 bucket created in step 1 uncomment iamRoleStatements ensuring it stays under the provider section:
provider:
  name: aws
  runtime: nodejs12.x
  lambdaHashingVersion: 20201221
  region: us-east-1
  iamRoleStatements:
    # roles will go here
    # ...
and under iamRoleStatements add the following code:
    - Effect: "Allow"
      Action:
        - "s3:GetObject"
        - "s3:PutObject"
      Resource:
        Fn::Join:
          - ""
          - - "arn:aws:s3:::"
            - "Ref" : "tomasz-example-s3-bucket"
            - "/*"

    - Effect: "Allow"
      Action:
        - "s3:ListBucket"
      Resource:
        Fn::Join:
          - ""
          - - "arn:aws:s3:::"
            - "tomasz-example-s3-bucket"
Let me explain what the above does briefly:
- Effect: "Allow" means that we're allowing for access to the certain resource defined below
- Action is a list of actions we're giving our lambda functions access to
- Resource - unique address to AWS resource (ARN) - in our case it's an S3 bucket
- Fn::Join is a serverless.yml specific function to concatenate strings, basically the following code:
Fn::Join:
  - ""
  - - "arn:aws:s3:::"
     - "Ref" : "tomasz-example-s3-bucket"
     - "/*"
produces:
arn:aws:s3:::tomasz-example-s3-bucket/*
more on ARN can be found here: https://docs.aws.amazon.com/general/latest/gr/aws-arns-and-namespaces.html
Now if you look again at the role statements it becomes clear - we give access to perform 3 different actions on tomasz-example-s3-bucket in 2 definitions where:
- The first one allows for "GetObject" (read file) and "PutObject" (create/update file) on tomasz-example-s3-bucket on any file hence the wildcard symbol (*) in the join.
- The second one allows for "ListBucket" (list all the files and directories from the bucket) on tomasz-example-s3-bucket - it's required to receive 404 Not Found status when a file does not exist.
more information about serverless.yml and role statements can be found in the official Serverless Framework documentation: https://www.serverless.com/framework/docs/providers/aws/guide/iam/
Summary
This is how your serverless.yml file should look like after all the modifications we've done in the previous steps:
service: my-s3-lambda-function
frameworkVersion: "2"

provider:
  name: aws
  runtime: nodejs12.x
  lambdaHashingVersion: 20201221
  # custom region
  region: eu-west-1

  # access rights to AWS resources
  iamRoleStatements:
    # allow for read, write and update any files in tomasz-example-s3-bucket
    - Effect: "Allow"
      Action:
        - "s3:GetObject"
        - "s3:PutObject"
      Resource:
        # concatenate the following strings
        Fn::Join:
          - ""
          - - "arn:aws:s3:::"
            - "tomasz-example-s3-bucket"
            # "*" used as a wildcard means "any files"
            - "/*"
    # allow for list files on tomasz-example-s3-bucket
    - Effect: "Allow"
      Action:
        - "s3:ListBucket"
      Resource:
        Fn::Join:
          - ""
          - - "arn:aws:s3:::"
            - "tomasz-example-s3-bucket"

functions:
  getUser:
    handler: src/handlers.getUser
    events:
      - http:
          # uuid is a custom and required path param (GET request for just /user won't work)
          path: /user/{uuid}
          method: get
  postUser:
    handler: src/handlers.postUser
    events:
      - http:
          path: /user
          method: post
  putUser:
    handler: src/handlers.putUser
    events:
      - http:
          # only requests like PUT /user/some-random-uuid will work
          path: /user/{uuid}
          method: put

plugins:
  - serverless-plugin-typescript
Step 4. The code
Ok. Infrastructure is done. Let's build our API.
We need to implement 3 functions:
- getUser: it will fetch a JSON file by UUID from S3 and return its contents in a response body
- postUser: it will create a new JSON file in the S3 bucket with the content extracted from the request body
- putUser: it will fetch the file by UUID to check its existence and then modify it by overwriting with the new data from the request body
getUser and putUser should return 404 Not Found if the user (file) doesn't exist.
To make sure the file created by postUser won't clash with an existing one we're going to use the
uuid library to generate a unique name.
Let's install uuid, then. Run the following command in your terminal from the root directory of your project:
npm install uuid
or
yarn add uuid
And here is the entire handler.ts file content with comments explaining all the behavior:
import { APIGatewayProxyEvent, APIGatewayProxyResult } from "aws-lambda";
import { S3 } from "aws-sdk";
import { v4 } from "uuid";

// your bucket name
const bucketName = "tomasz-example-s3-bucket";

// creating instance of AWS S3 management object
const s3 = new S3();

// user interface (only uuid field is required)
interface User extends Object {
  uuid: string;
}

// HTTP error class for an error response
class HTTPError extends Error {
  readonly statusCode: number;

  constructor(message: string, statusCode: number) {
    super(message);
    this.statusCode = statusCode;
  }
}

// getUser function for /user GET endpoint
export const getUser = async (event: APIGatewayProxyEvent): Promise<APIGatewayProxyResult> => {
  try {
    // retrieves uuid from request path
    const uuid = getUUID(event);

    // it throws an Error if user doesn't exist
    await validateUserExists(uuid);

    // getting the object with aws-sdk, ".promise()" is required to use async-await
    const output = await s3
      .getObject({
        Bucket: bucketName,
        // Key is file name in AWS terminology
        Key: getUserFileName(uuid),
      })
      .promise();

    // output.Body contains the content of the S3 JSON file
    // we expect the file to not be empty, script doesn't fail if it is empty though
    const user = output.Body?.toString() || "";

    // return successfull response with the user
    return {
      statusCode: 200,
      body: user,
    };
  } catch (e) {
    // handles error response
    return getErrorResult(e);
  }
};

// extracts uuid from request path parameters
const getUUID = (event: APIGatewayProxyEvent): string => {
  const uuid = event.pathParameters!["uuid"];

  // if uuid is non-existent throws HTTP error - bad request
  if (!uuid) {
    throw new HTTPError("Missing UUID", 400);
  }

  return uuid;
};

// gets file info from S3 and if the call is successful the return value is void
const validateUserExists = async (uuid: string): Promise<void> => {
  try {
    await s3.headObject({ Bucket: bucketName, Key: getUserFileName(uuid) }).promise();
  } catch (e) {
    // if head object fails we check for the error code
    if (e.code === "NotFound" || e.code === "NoSuchKey") {
      // in case code is "NotFoud" error is re-thrown as 404 HTTP error
      throw new HTTPError("user not found", 404);
    }

    // if we got unexpected error code we re-throw orignal error
    throw e;
  }
};

// returns user file name with "<uuid>.json" format
const getUserFileName = (uuid: string): string => `${uuid}.json`;

// converts HTTPError or Error to APIGatewayProxyResult format (statusCode and message)
const getErrorResult = (e: Error): APIGatewayProxyResult => {
  // handle HTTPError
  if (e instanceof HTTPError) {
    return {
      statusCode: e.statusCode,
      body: JSON.stringify({ error: e.message }),
    };
  }

  // handle unknown error
  return {
    statusCode: 500,
    body: JSON.stringify(e),
  };
};

// postUser function for /user POST endpoint
export const postUser = async (event: APIGatewayProxyEvent): Promise<APIGatewayProxyResult> => {
  try {
    // generate random uuid
    const uuid = v4();

    // create new JSON file with HTTP request body (new user)
    const user = await upsertUser(uuid, event.body);

    // respond with 201 created and newly created user
    return {
      statusCode: 201,
      body: JSON.stringify(user),
    };
  } catch (e) {
    // handle errorr
    return getErrorResult(e);
  }
};

// create or update user (S3 JSON file)
const upsertUser = async (uuid: string, body: string | null): Promise<User> => {
  // prepare user object from HTTP request body parsed to JSON and given uuid
  const user = {
    ...JSON.parse(body || "{}"),
    uuid,
  };

  // uploads a file to S3
  await s3
    .putObject({
      Bucket: bucketName,
      // <uuid>.json
      Key: getUserFileName(uuid),
      // contents of a file (stringified user object)
      Body: JSON.stringify(user),
    })
    .promise();

  return user;
};

// postUser function for /user PUT endpoint
export const putUser = async (event: APIGatewayProxyEvent): Promise<APIGatewayProxyResult> => {
  try {
    // retrieve uuid from request path parameters
    const uuid = getUUID(event);

    // validate if user (JSON file) exists
    await validateUserExists(uuid);

    // update user (JSON file)
    const user = await upsertUser(uuid, event.body);

    // return successful response
    return {
      statusCode: 200,
      body: JSON.stringify(user),
    };
  } catch (e) {
    // handle error response
    return getErrorResult(e);
  }
};
if you'd like to see how I implemented this step by step I refer you to the video tutorial I attached at the beginning of this article.
Step 5. Deployment.
With all the infrastructure defined in serverless.yml and implementation in handlers.ts deployment is going to be the easiest step.
In the terminal run the following command from your project directory:
serverless deploy
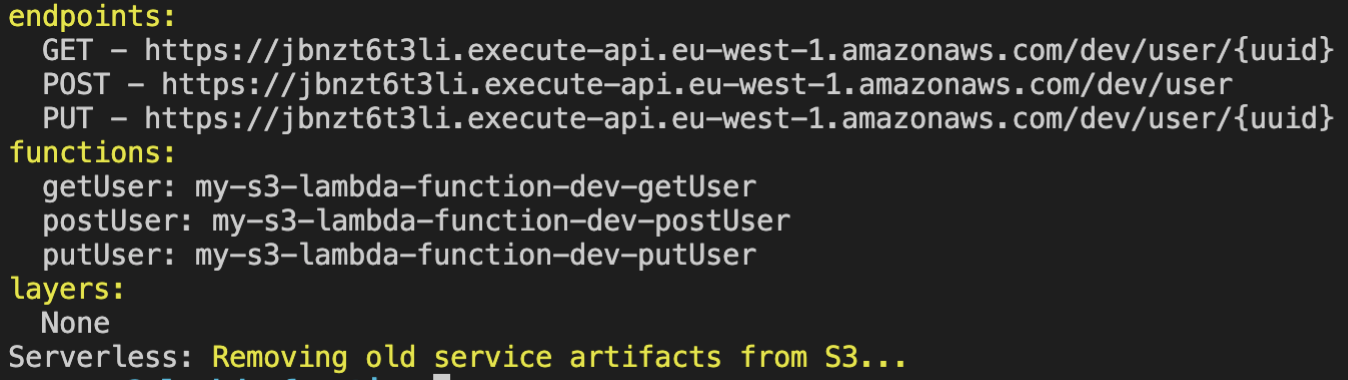
After few minutes of waiting you should see the success message and URLs to our newly created endpoints:
Step 6. Test it.
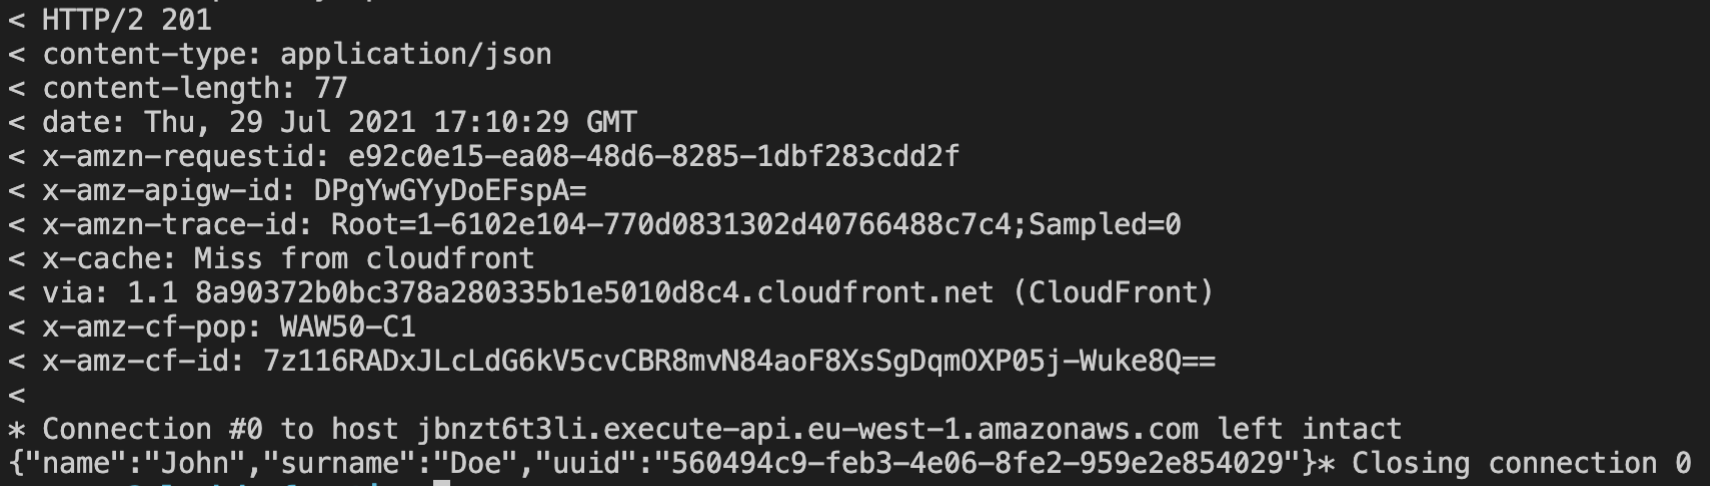
To check if the API works correctly let's create a new user by copying API Gateway POST endpoint URL and pasting it into the console curl command:
curl -X POST -d '{"name":"John","surname": "Doe"}' -v \
https://jbnzt6t3li.execute-api.eu-west-1.amazonaws.com/dev/user
as an alternative to
curlcommand you can use Postman: https://learning.postman.com/docs/getting-started/sending-the-first-request/
You should receive a successful response, similar to the one below:
And now we can use the UUID from the response body to fetch the user data:
curl -X GET https://jbnzt6t3li.execute-api.eu-west-1.amazonaws.com/dev/user/560494c9-feb3-4e06-8fe2-959e2e854029
the response body should be:
200 OK

{
  "name":"John",
  "surname":"Doe",
  "uuid":"560494c9-feb3-4e06-8fe2-959e2e854029"
}
or you can use HTTP PUT to modify the user data:
curl -X PUT -d '{"name":"Michael","surname":"Smith"}' -v \
https://jbnzt6t3li.execute-api.eu-west-1.amazonaws.com/dev/user/560494c9-feb3-4e06-8fe2-959e2e854029
the response body:
200 OK

{
  "name":"Michael",
  "surname":"Smith",
  "uuid":"560494c9-feb3-4e06-8fe2-959e2e854029"
}
In case the resource you're trying to fetch or update doesn't exist you should get 404 Not Found error:
Request:
curl -X GET https://jbnzt6t3li.execute-api.eu-west-1.amazonaws.com/dev/user/123-incorrect-uuid
Response:
404 Not Found

{"error":"user not found"}
Feel free to add more users, you can also log in to the AWS console and check all the created files in your S3 bucket.
Conclusion
Congratulations on getting to the end of my article 🎉.
If you followed all the above steps it means you have successfully created a simple but fully scalable file-based User Management API with Serverless Framework, AWS Lambda, API Gateway, and AWS S3.
I encourage you to experiment with the code and infrastructure. A good exercise could be to implement /user DELETE endpoint to remove the user by UUID or /users endpoint that lists all the stored users.
Don't forget that whenever you modify the infrastructure configuration in serverless.yml or the code in handlers.ts you have to run serverless deploy command from the project directory to propagate the changes on AWS.
GitHub repository with all the code from this article:
If you liked this post and you're looking for more give me a follow on Twitter 🐦 so you'll stay up to date with all the future content I create.
Citations
[1]: https://aws.amazon.com/blogs/apn/deploying-code-faster-with-serverless-framework-and-aws-service-catalog/
[2]: https://docs.aws.amazon.com/AmazonS3/latest/userguide/Welcome.html
[3]: https://aws.amazon.com/api-gateway/
[4]: https://en.wikipedia.org/wiki/TypeScript
This post has an informative manner I don't receive any commissions from services promoted here.